Thursday, November 10, 2011

The Sounding Joy Easel Card

My first Christmas card design for the coming season! It uses the set "The Sounding Joy", as well as the 3/8" Quilted Satin Ribbon, now available in the Holiday Mini. This is an easel card, made using the Big Shot and the Scallop Circle Die.

The star word image is stamped in Crumb Cake on Very Vanilla, with the Joy image over-stamped in Cherry Cobbler. The top-most Scallop Circle is embossed with the Petals-a-Plenty Embossing Folder, then spritzed with Gold Smooch. It is finished off with the Quilted Ribbon bow and a Gold Glimmer Brad.

Inside is wording from the "Come to Bethlehem" stamp set, stamped in Cherry Cobbler on Very Vanilla, and punched using the Decorative Label Punch. ENJOY!

Blog Siggy

Tuesday, September 27, 2011

Fabulous Fall Florets

This is card 3 of 3 for my October workshop. This design is a CASE from a very talented demonstrator, Mary B. To 'make it my own", I changed up the color combo and the style of ribbon.

The 2011/13 In Color Color Coach gave me this non-traditional Fall color combo: Concord Crush, Daffodil Delight and Tangerine Tango.

Oh Hey - it's the Big Shot AGAIN! hee hee This time with the Lattice Die and the Perfectly Polka Dots Embossing Folder.

Th design is finished off with concord Crush ribbon and an In Color Polka Dot Brad.

ENJOY!

Blog Siggy

Punched Fall Mums

This is card 2 of 3 for my October workshop. I CASE'D this design from another super talented demonstrator, Mary D. but of course had to 'make it my own' by changing up colors and embellishments.

This design uses a bounty of classic Fall colors: Cherry Cobbler, Peach parfait, Old Olive, More Mustard and Cajun Craze for the 'Mums' which were made using the Blossom Bouquet Triple Layer Punch. They are layered on Early Espresso, then the whole piece was run through the Big Shot using the Square Lattice Embossing Folder for the "Inlaid Embossing" technique. The design is finished off with Self-Adhesive Rhinestones and some Pumpkin Pie Grosgrain Ribbon.
ENJOY!

Blog Siggy

Bright Blessings

This is card 1 of 3 we will be making at my October workshop. It features a Jumbo Wheel called "Bright Blessings" as the focal image, as well as a non-traditional Fall color combo which I found on the 2011/13 In Colors Color Coach.

The focal image is rolled in Early Espresso on Very Vanilla, then I cut apart the image to focus just on the part I wanted. Both of the sentiments shown are part of the Bright Blessings jumbo wheel. It is mounted on More Mustard, and then on Island Indigo and Lucky Limeade. I sponged some Lucky Limeade tone on tone to cool the brightness just a bit. The torn edges on the Island Indigo and the More Mustard add to the Fall theme, as does the Hemp Twine embellishment. The card is finished off with a couple of sprays of Gold Smooch spritz for that Fall 'glow'.

ENJOY!

Blog Siggy

Friday, August 26, 2011

Fabulous Floating Florets

Here is project 3 of 3 from my Stampin' UP! New Catalog Open House earlier this month. This was the 'detailed' project that took some time to do - but WOW! Look at the results! This design is a "techinque" card that showcases the 'floating re-inkers' technique, along with several NEW products including: New In Colors Island Indigo and Calypso Coral, Designer Frames Embossing Folder, Ruffled Ribbon and the stamp sets "Fabulous Florets" and "Petite Pairs."

The Floating Re-Inkers technique uses Shimmer Paper (though you can't tell in the picture, you CAN tell in person!) with a line image that is heat embossed in black. Then, you spritz the embossed card stock with LOTS of water, and use the re-inker to add a few drops of ink to the image. The ink spread in the water all on it's own, and you can also use an Aquapainter to swish it around and achieve more color consistency. I then used the Paper Snips to cut out the Fabulous Florets, and mount them with Dimensionals on the cut out embossed frame (run through the Big Shot of course!).

I used the Island Indigo stamp pad to create the background for the focal image, by dragging it across the same color card stock. The whole thing came together very well, and is simply GORGEOUS! ENJOY!


Blog Siggy

Vellum Overlay Cards


Here is project 2 of 3 from my Stampin' Up! New Catalog Open House earlier this month. Another SUPER fast and easy design that gives the added BONUS of using up the slightly larger pieces of Designer Series Papers (DSP) most of us have lying around our craft rooms. Just choose a coordinating solid color of card stock for the base and the ribbon.

Here, I used Old Olive with the NEW DSP Paisley Petals. I used Vellum Card Stock to run through the Big Shot in the Elegant Bouquet Embossing folder. Just use your Snail or Mono-Adhesive to adhere the vellum, because the ribbon covers up the adhesive showing through the vellum. (TIP: In my experience, there is NO adhesive that doesn't show through vellum, not even the specialty vellum adhesives that are available.) The sentiment is from a NEW stamp set called "Blessings from Heaven", and is stamped in StazOn black ink as the surface finish of vellum requires a specialty ink like StazOn.

I went through my DSP scrap drawer and pulled a bunch of retired DSP and made up a stack of cards. TIP: Leave the sentiment off, until you know for sure what occasion you will be using the card for. Then you will have a stash of ready and waiting cards whenever the next occasion arises! ENJOY!

Blog Siggy

Lucky Limeade Friend

This was project 1 of 3 at my Stampin' Up! New Catalog Open House earlier this month. A simple, quick design showcasing all NEW products including: the new In Color of Lucky Limeade, Chocolate Chip Polka Dot Scallop Ribbon and the stamp set "My Friend".

Where the ribbon knot is tied, I used the Small Oval Punch to notch out the focal image layered card stock.

ENJOY!


Blog Siggy

Saturday, May 28, 2011

Unanswered Prayers Card

This design was also made for a challenge over at StampTV. The challenge was simple - black and white only! I chose to use an SU! printed window sheet overlay for the main image, on the black. For the sentiment, I used my Basic Black Stampin' Write to ink up just the outline of a stamp from the SU! set "Four Frames", then stamped a sentiment from GinaK's "You Are Not Alone". A little SU! 1/4" White Grosgrain Ribbon adds the finishing touch. ENJOY!

Blog Siggy

Monochromatic Birthday

I made this card for a challenge over at GinaK Designs StampTV. The challenge was to use 1 layer, 1 color and 1 embellishment. You could also accent with glitter, etc. I accented with the Spica Glitter Pen in Pink, around the edge of the flower, as well as in the middle of the flower. I used SU! Whisper White and Melon Mambo, as well as the retired Melon Mambo Polka Dot Grosgrain Ribbon. Images come from two stamp sets by Melanie Muenchinger for GinaK Designs.
ENJOY!

Blog Siggy

Friend to Friend

I love the colors on this card, as they are bright and cheerful and remind me of several of my friends! I used Stampin' Up!'s Pear Pizzazz for the base layer, as well as to highlight the Finial Press embossing folder. Nestabilities scalloped circle made my focal image pop, along with some sponging around the edges with SU! Pumpkin Pie ink. The Elzy Bells image is colored with Copic Markers. The sentiment uses all SU!: Modern Label Punch and the stamp set "Teeny Tiny Wishes", and a flower brad - all popped up on Dimensionals. ENJOY!

Blog Siggy

Sunday, May 22, 2011

Confirmation Card & Thank You


These are thank you cards I made for a friend's son, for his Confirmation. I used Crumb Cake and Cherry Cobbler, the Big Shot and the reverse cut out of the Top Note die, a retired set called "Refuge & Strength". The first dove image is also from a retired set called "Peace Be Unto You" - I had four of these images already stamped, and on hand. This is the image I originally wanted to use, however, the friend I had previously borrowed the stamp set from, no longer had it. So, on to Plan B!


Instead, I used the Dove from the Big Shot Holiday Windows Movers & Shapers die! A different look, but still a good look.

And for his confirmation card, I used the Top Note cut out and the reverse cut out from the Holiday windows Mover & Shapers Dove die! I love the effect of using the reverse cut outs from the Big Shot dies.

Also used were the Word Window and Designer Label punches.


ENJOY!

Blog Siggy

Monday, February 28, 2011

Daisies in Silhouette

This is project 2 of 3 - from a workshop this past weekend. I LOVE the simplicity of this card with it's WOW factor of the double technique of Heat Embossing and Silhouette.

This is another one of my favorite Stampin' up sets - "Upsy Daisy" - both image and sentiment were stamped in Whisper White Craft Ink, then heat embossed with white embossing powder. The silhouette technique uses a q-tip to apply ink, in this case, Crumb Cake - around the edges of the heat embossed image. When you are satisfied with your silhouette, use a tissue to wipe the excess ink off the heat embossed image. I 'tied up' this design with some Linen Thread and layered punches. I LOVE using white heat embossing on Naturals Ivory card stock - so elegant and striking. ENJOY!

Blog Siggy

Sunday, February 27, 2011

Special Technique - Easter Wishes

This is project 3 of 3 from a workshop this past weekend. If you follow my blog, you *know* I {heart} my Big Shot! This awesome technique utilizes the Big Shot - it's called "Inlaid Embossing". First I created the butterflies using the Beautiful Wings Embosslit (an SU exclusive) in Perfect Plum, Pear Pizzazz and Bashful Blue. Then I grabbed the swirl image from "Baroque Motifs", inked it in Peach Parfait and stamped off 3 times before stamping the image on the Very Vanilla. I used Snail Adhesive to adhere the butterflies. Here's where the technique comes in - place the Very Vanilla layer that has the butterflies on it - in the Perfect Polka Dots Embossing Folder and run it through the Big Shot. It look s like the butterflies are part of the layer!

Tip: Try the Inlaid embossing Technique using some of SU's heart or circle punches too - and try different embossing folders too - like Square lattice, Vintage Wallpaper and Finial Press.

The sentiment is from "All Holidays", and was stamped in Perfect Plum, then punched with the Curly Label and attached with Dimensionals. The tiny Perfect Plum butterfly is our touch of 'bling' from the Two Way Glue Pen and Dazzling Diamonds Glitter, and is attached with a rolled up Mini Glue Dot. The In Color, Peach Parfait, is the base of the card. ENJOY!

Blog Siggy

Sale-abration is Just Buzzin By!

Have you taken advantage of Sale-abration (SAB) yet? You've only got one month left to get all those wonderful FREE items (with a $50 order, $300 in workshop orders, or as a new recruit of the StampinJewels family.)

This is project 1 of 3 from Beth H.'s SAB workshop this past weekend. It showcases the SAB Freebie choice - "Ice Cream Parlor Ribbon & Button Pack" along with one of my favorite Stampin' Up sets - "Just Buzzin By". These bright and cheery colors sure help with the cold weather blues! they are Melon Mambo, Daffodil Delight,Pacific Point & Whisper White. ENJOY!

Blog Siggy

Monday, February 14, 2011

Eat Chocolate...Ice Cream?

Love the "Eat Chocolate" stamp set in the Occasions Mini? Here's an alternative use - scoops of ice cream! I got the initial idea from a fellow demonstrator, then designed this card myself. The Square Lattice Embossing folder in the Big Shot makes perfect sugar cones, don't you think?! I used Soft Suede Textured card stock for the base layer, then Pretty in Pink and Daffodil Delight for the strawberry and vanilla ice cream - and Pretty In Pink and So Saffrom with the Scallop Edge Punch. A Whisper White circle and Grosgrain ribbon bow set-off the focal images. But it';s the Crystal Effects on the "ice cream" that really makes this design so - Yummy! ENJOY!

Blog Siggy

Three Little Words...

Here's another simple card - though it doesn't appear so at first. I used Three Little Words (available as a Sale-abration FREE choice!) along with I {Heart} Hearts stamp sets. Colors are Pink Pirouette, Regal Rose & Whisper White ink and card stock, along with some Pretty in Pink Satin Ribbon. The key is to stamp on the Whisper White first, then run it through the Big Shot in the Square Lattice Embossing Folder Voila! 'textured' stamping. ENJOY!

Blog Siggy

Sunday, February 13, 2011

Don't Be a Quitter - Eat Chocolate!

Here's another design using the "Eat Chocolate" stamp set in the Occasions Mini. This is a simple design using Early Espresso, Marina Mist, Pear Pizzaz and Very Vanilla along with the XL Decorative Label and Eyelet Border Punches.
SWEET and simple! ;) ENJOY!

Blog Siggy

Glimmer Valentine

The Glimmer Paper in the Occasions Mini is wonderful! It's a nice, thick weight with red glitter already attached so no clean up after using it! For this design, another inspiration from a fellow demonstrator - I used the Big Shot for more Embossing Folder fun with the Perfect POlka Dot and Finial Press folders. The stamp set is the Level One Host set Punch Potpourri and the sentiment is from Teeny Tiny Wishes ( a wonderfully versatile set with so many holidays and special occasion sentiments). Punches: XL Full Heart, Modern Label and Word Window. The Basic Grey Taffeta Ribbon ties together the color combo of Basic Grey, Pirouette Pink, Real Red and Whisper White.

This would make a lovely wedding, anniversary or just because I love you... ENJOY!

Blog Siggy

Chocolate Favors


Have you seen the "Eat Chocolate" stamp set in the Occasions Mini yet? Too fun!

The first project is Daffodil Delight and Chocolate Chip with a smidge of Naturals White - all wrapped around a Hershey bar. Also used were both the Tag Punches and the XL Round Tab Punch. The Chocolate Chip Satin Ribbon looks like liquid chocolate to me! There's a touch of Daffodil Delight 1/8" Taffeta Ribbon.

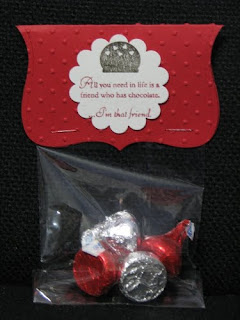
The second project uses the Big Shot, Top Note die (fold the Top Note in half) and Perfect Polka Dots Embossing Folder for the Small Cello Bag topper in Real Red. Along with the 1 3/4" XL Scallop Circle Punch for the sentiment. I inked the stamp using the Early Espresso and Real Red Stampin Write Markers. ENJOY!

Blog Siggy

Saturday, February 12, 2011

Cherry Cobbler, Vanilla & Gold Valentine

I love the Cherry Cobbler color SU added to the core color families! It is a lovely, deep red that pairs well with the Very Vanilla and Gold Heat Embossing, Brads & Smooch Spritz used here.

There's a special technique shown here too - Faux Embossing - do you see it? It's the tone-on-tone Heart to Heart XL Punches that are Smooched Gold at the bottom of the card front. It's a neat technique that looks different depending on the color you use for it. I added the Gold Smooch Spritz to set off the gold heat embossed (and popped up on Dimensionals) sentiment and brads. The Scallop Trim Corner Punch, Very Vanilla Satin Ribbon and lightly sponging of Cherry Cobbler around the focal image layer give the finishing touches to this lovely design. The focal image is in the Occasions Mini Catalog - Be My Valentine single stamp.
ENJOY!

Blog Siggy

Love Birds in Riding Hood Red


Two cards of the same layout but in different shapes. The card on the left uses Very Vanilla, Riding Hood Red and Basic Black and Basic Pearls and is meant for the SU Small Open-Ended Envelope, while the one the right uses Whisper White, Riding Hood Red & Basic Black and Basic Rhinestones in the standard size card. Both use the I {Love} Love Jumbo Wheel and the stamp set Love You Much., along with three punches: Decorative Label, XL Oval and Heart to Heart. Dimensionals pop up the love bird layered image, and there is a piece of Basic Black Satin Ribbon under it. ENJOY!
Blog Siggy

Vanilla Valentine

I saw a design similar to this done by a fellow demonstrator and wanted to make one too - it's just so elegant all in Very Vanilla!

I used the Big Shot and the Vintage Wallpaper embossing folder, along with Very Vanilla Craft Ink and Clear Embossing Powder and my SU Heat Tool. A few Basic Pearls (self-adhesive - woohoo!) and some sleek Very Vanilla Satin Ribbon.

I know it's hard to see in this picture - so TRY it yourself and see just how elegant all Very Vanilla, or even all Whisper White is. ENJOY!

Blog Siggy