Merry Christmas and Happy New Year!
I have a GIFT FOR ALL ONLINE ORDERS placed NOW through December 31st:
- First Online Order placed receives a certificate for 20% off one item on your next order
- Second Online Order placed receives a certificate for 15% off one item on your next order
- Third Online Order placed receives a certificate for 10% off one item on your next order
- All other Online Orders placed receive a certificate for a FREE package of single color card stock from one of the four SU! color families with your next order.
Head on over to the StampinJewels SU! Website , once you're there click on SHOP NOW and place your order. I will contact you to let you know which gift you may redeem with your next order (from the Spring/Summer 2009 Idea Book & Catalog perhaps? Coming January 18th!)
Feel free to share the StampinJewels ordering love - if you refer a new-to-me friend - I'll have another gift for you!
Edited to Note: If you are looking to order Retiring Sets - after you click on Shop Now from my SU! site, click on Specials, then Retiring - and all the retiring sets will come up there.
Happy Shopping and THANK YOU for visiting my blog, and for your business!
Tuesday, December 30, 2008
Tuesday, December 16, 2008
SU! Gift Certificate Holder
 This is a gift certificate holder I created to hold a SU! Gift Certificate. I used the soon-to-be-retiring sets Punch Pals and Deer Friend(Hostess set). Using my Atyou Spica Glitter Pens I added some sparkle to the card stock, but I don't think you'll be able to see it in the scan. I stamped the base layers tone-on-tone using Mellow Moss and Ruby Red. I highlighted the Mellow Moss gifts with a the Clear Spica Glitter pen, and the Ruby Red stars and snowflakes on the Scallop circle with the Red Spica Glitter Pen. I also added a Clear Spica Glitter outline and center dot to the punched Mellow Moss stars. The middle of the Scallop Circle snowflakes are dotted with the White Signo Gel Pen. Lastly - I outlined the garland on the focal image tree with the Red Spica Glitter Pen, and the star with the Yellow Spica glitter Pen. Whew! That was a lot of detail to explain! LOL Don't forget the glitter and glaze pens - they really give your projects that subtle 'POP" that sometimes makes all the difference. Merry Christmas!
 Stamps: Punch Pals & Deer Friends
Cardstock: Mellow Moss, Ruby Red & Whisper White
Ink: Mellow Moss & Ruby Red
Accessories: Scallop Circle, 1 1/4" Circle and Small Star Punches, Atyou Spica Glitter Pens, Stampin' Dimensionals
ENJOY!
Sunday, December 14, 2008
Holy Triptych Holy Family Card
 This is our second personal Christmas card for this year. (The first one was HERE) I got the idea for doing an all white card, with a touch of metallic, from GinaK Designs blog awhile back. It is simple and beautiful to look at - but there were still several steps to it's creation. I layered Whisper White on Whisper White, only the top layer was run through the Cuttlebug A2 Embossing Folder called D'vine Swirls. Then I used the Nestabilities Classic Oval Set for both the scalloped and plain ovals. The Holy Family is heat embossed in silver, and there's a clear gemstone brad in the middle of the star. (These ar e in the SU! Pretties Kit, as well as being available from other sources.)
Stamps: Holy Triptych
Cardstock: Whisper White, Brushed Silver
Ink: Versamark
Accessories: Whisper White Taffeta Ribbon, Silver Cord (retired SU), Stampin' Dimensionals, Nestabilities, Cuttlebug
ENJOY!
Tuesday, December 09, 2008
Wine Gift
Need a QUICK gift? I try to keep gift bags of different sizes on hand for just such an occasion - a quick gift. This was a prize for the TrulyWed Game we played at our WWME Community Christmas party this past weekend. It literally took a few minutes to get together. The wine bottle decor was an image from the retired SU! set So Many Scallops stamped in Encore Silver Metallic ink. I then stamped the same image in Riding Hood Red and used the 3/4" Circle Punch so I could get the just the middle snowflake image, and attached it on a half a Stampin' Dimensional. (Tip: I always cut these in half so they last twice as long. Most projects don't require a full one anyway.) The poinsettia image is from the beautiful set Christ is Born.
Stamps: Christ is Born, So Many Scallops (retired)
Card Stock: Whisper White
Ink: Riding Hood Red & Encore Silver Metallic
Accessories: Scallop and 3/4" Circle Punches, Riding Hood Red 5/8" Striped Grosgrain Ribbon, Mini Glue Dots, Stampin' Dimensionals
ENJOY!
Wednesday, December 03, 2008
Inspiration in Many Places

Inspiration is everywhere! In the cards we receive, in paper-crafting magazines and on websites, from demonstrators like me! ;) The inspiration for this card is two-fold. First I was inspired by my birthday card from Beth H. HERE
The second wave of inspiration came from a card (the one here on the left) we received from our prayer couple on the Worldwide Marriage Encounter Weekend we just helped present the weekend before Thanksgiving. (Remember the Altered Notebooks?)

So here is my version of the inspirations meshed! The SU! Flower Fusion felt flowers and antique brass brads add wonderful dimension and texture all at once. I was also happy to have a project to use the Old Olive Love & Happiness RubOns with - I had used the other colors, but not the Old Olive yet! I layered the inside of the card with Old Olive, then used Chocolate Chip RubOns inside the card too - as shown in the next picture.
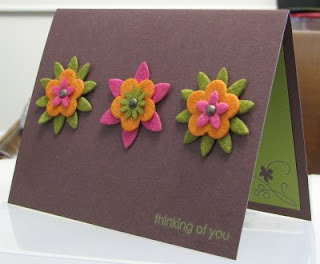
Card stock, Embellishments, Accessories make for a very quick and cute card! Try it yourself, and post your links here!
Cardstock: Chocolate Chip & Old Olive
Accessories: Flower Fusion felt flowers, Antique Brass Brads & Love & Happiness RubOns (both retired SU!), Mini Glue Dots
ENJOY!
Wednesday, November 26, 2008
YOU Did It!
 I received this lovely card from Beth H. for my birthday yesterday! Pretty Fall colors with the Old Olive and Pumpkin Pie with just a bright and cheery touch of Rose Red. Wonderful use of the Flower Fusion felt flowers Beth! I especially like the heart-shaped brads as the flower centers. THANKS to all who sent me a birthday card - hand-made or store bought. I truly appreciate your good wishes and friendship.
Know what I got for my birthday (it was yesterday, by the way)? A Belgian Waffle Maker! Yahoooooo! I've been wanting one for these for years. The kids and I enjoyed my first ever Blegian waffles for lunch today - YUMMY! There was some left over real whipped cream from my angel food birthday cake that was perfect to top off the waffles with, mmmm - butter, real maple syrup and real whipped cream - I'm getting hungry! lol Good thing dinner is in the crock pot... ENJOY!
Friday, November 21, 2008
Altered Notebooks
I've mentioned before that my husband and I are part of the Presenting Team for Worldwide Marriage Encounter weekends in our area. This weekend we will be helping to present for our third time. I like to bring a small gift for the other Team members ( 2 more couples and a Catholic priest). For this Weekend's Team, I altered some composition notebooks into dialogue books. (Dialogue is a communication technique taught on the Weekend.) They all have lighthouses on them, as this is a special symbol for Presenting Team Sacraments. Our discerning weekend utilized the image of a lighthouse to build it's concepts - basically that as a couple, our Christian Sacrament is like a lighthouse - a place where God's light shines out from as a beacon of hope and love to other married couples and priests. See the "Enjoy" stamped in the background? All my posts end with this sentiment - now you know where I got it from! :) They also have an appropriate Scripture verse stamped on the inside cover.
If you are reading this, and are a praying person, please pray for all the Sacraments (19 in all - 18 couples and 1 priest) on our Weekend, and on Weekends throughout the world - that they will allow the Holy Spirit to work through and in them and their relationship and accept the many gifts God is offering them on this Weekend. Thanks!
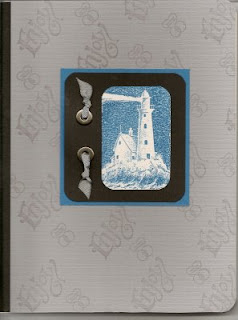
THIS notebook is for the Team priest, Fr. Dennis.
Stamps: A Light Unto My Path, Everyday Expressions (retired) and non-SU Marriage Encounter stamp
Cardstock: Going Gray Textured, Pacific Point, Basic Black & Naturals White
Ink: Versamark, Pacific Point
Accessories: Pewter Jumbo Eyelets, Crop-a-dile, Basic Gray Taffeta Ribbon, Corner Rounder Punch
We so enjoy getting to know the priest Team member on the Weekends we've participated in. His sharing is always amazing and inspiring, and gives good insight into the Sacrament of Holy Orders and that is lived out.
 THIS notebook is one of a pair, and is for Ralph and Julie.
We met Ralph & Julie in October at a WWME Marriage Enrichment conference. We are looking forward to getting to know them through their Weekend talks also. They are not from our general area, rather they are from a bit farther south in Illinois. Hope they like their dialogue books!
Stamps: Coast to Coast & Everyday Expressions (both retired); non-SU WWME stamp
Cardstock: Chocolate Chip, Rose Red, Almost Amethyst, So Saffron & Confetti Cream
Ink: Chocolate Chip & Versamark
Accessories: Rose Red 1/4" Grosgrain Ribbon, Ticket Corner Punch, 1/16" Hand Punch, Antique Brass Hodgepodge Brads (retired)
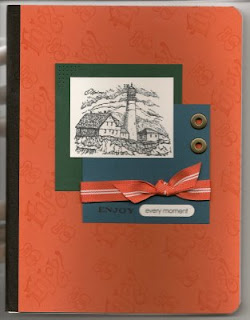 THIS notebook, also one of a pair, is for Garry & Arla.
We've known Garry & Arla for quite awhile now, first meeting them at a WWME Family Camp Out we attended while pregnant with our first child. Garry & Arla borrowed us a bowl and spatula so we could make our pancake breakfast! lol (Always forget *something* when camping!) They also presented on our second WWME Weekend in 2007, AND workshopped us as we wrote our first set of talks. They are a beautiful and inspirational Sacrament!
Stamps: Enjoy Every Moment & Sweet Sampler, Coast to Coast & Everyday Expressions(both retired), non-SU! WWME stamp
Cardstock: Tangerine Tango, Handsome Hunter, Not Quite Navy & Whisper White
Ink: Versamark and Memento Tuxedo Black
Accessories: Antique Brass Jumbo Eyelets, Crop-a-dile, Word Window Punch & Tangerine Tango 5/8" Striped Grosgrain Ribbon. ENJOY!
If you are reading this, and are a praying person, please pray for all the Sacraments (19 in all - 18 couples and 1 priest) on our Weekend, and on Weekends throughout the world - that they will allow the Holy Spirit to work through and in them and their relationship and accept the many gifts God is offering them on this Weekend. Thanks!

THIS notebook is for the Team priest, Fr. Dennis.
Stamps: A Light Unto My Path, Everyday Expressions (retired) and non-SU Marriage Encounter stamp
Cardstock: Going Gray Textured, Pacific Point, Basic Black & Naturals White
Ink: Versamark, Pacific Point
Accessories: Pewter Jumbo Eyelets, Crop-a-dile, Basic Gray Taffeta Ribbon, Corner Rounder Punch
We so enjoy getting to know the priest Team member on the Weekends we've participated in. His sharing is always amazing and inspiring, and gives good insight into the Sacrament of Holy Orders and that is lived out.
 THIS notebook is one of a pair, and is for Ralph and Julie.
We met Ralph & Julie in October at a WWME Marriage Enrichment conference. We are looking forward to getting to know them through their Weekend talks also. They are not from our general area, rather they are from a bit farther south in Illinois. Hope they like their dialogue books!
Stamps: Coast to Coast & Everyday Expressions (both retired); non-SU WWME stamp
Cardstock: Chocolate Chip, Rose Red, Almost Amethyst, So Saffron & Confetti Cream
Ink: Chocolate Chip & Versamark
Accessories: Rose Red 1/4" Grosgrain Ribbon, Ticket Corner Punch, 1/16" Hand Punch, Antique Brass Hodgepodge Brads (retired)
 THIS notebook, also one of a pair, is for Garry & Arla.
We've known Garry & Arla for quite awhile now, first meeting them at a WWME Family Camp Out we attended while pregnant with our first child. Garry & Arla borrowed us a bowl and spatula so we could make our pancake breakfast! lol (Always forget *something* when camping!) They also presented on our second WWME Weekend in 2007, AND workshopped us as we wrote our first set of talks. They are a beautiful and inspirational Sacrament!
Stamps: Enjoy Every Moment & Sweet Sampler, Coast to Coast & Everyday Expressions(both retired), non-SU! WWME stamp
Cardstock: Tangerine Tango, Handsome Hunter, Not Quite Navy & Whisper White
Ink: Versamark and Memento Tuxedo Black
Accessories: Antique Brass Jumbo Eyelets, Crop-a-dile, Word Window Punch & Tangerine Tango 5/8" Striped Grosgrain Ribbon. ENJOY!
Monday, November 17, 2008
YOU Did It! - Thanksgiving Turkey Card
 This ADORABLE Turkey, bearing the "Eat Ham" picket sign, brought giggles and smiles to me and the kids when we received it the other day. StampinJewel Beth H. designed this card. THANKS Beth!
[Side note: WE had some turkey bacon for lunch today - and there was an image of a pig with a sign that said "Eat More Turkey" - the kids thought that was hilarious!]
Cardstock: Kraft, Old Olive, Ruby Red, Pumpkin Pie, More Mustard, Really Rust, Chocolate Chip & Basic Black
Accessories: Scallop Circle, Slit & Word Window Punches, retired Spring Flower Bouquet Punch, googlie eyes.
ENJOY!
Saturday, November 15, 2008
Star Studded Triptych Kings - Part 2
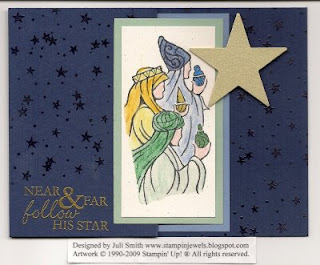 I love the images in the SU! Holy Triptych set (remember last year's Holy Triptych triptych card?) And why do I call it Part 2? Well, because this is the card I made for my folks last year(click here to see it), and liked it so much that I made a few slight changes for us this year!
I water-colored the kings, using the Aquapainter and the Watercolor Wonder Crayons. I colored directly onto the Naturals White card stock, then swabbed over the color to "melt" it and spread it around. I found that doing it this way provided a deeper, richer color, while maintaining the watercolor style I wanted. (I used straight marker coloring on my folks cards last year.
Here is a view from a looking down angle. I wanted to show you the z-fold of the card. The card is still 5 1/2" across, then you score the top fold at 2 3/4" and fold it back.
I like the ease of layering colors with this fold. Normally, a z-fold card doesn't have something to 'tuck the fold under', but I added the tuck under star seeing as it is the Three Wisemen. :)
One of my other favorite parts of this design is the starry night sky, created by clear embossing the stars on the dark card stock color.
BTW - Spica Glitter Pens are ON SALE over at CreativePlayStamps - tell them StampinJewels sent you!
Stamps: Holy Triptych(current), Background Basics & Star Studded Season (both retired)
Cardstock: Night of Navy, Brocade Blue, Sage Shadow, Brushed Gold & Naturals White
Ink: Versamark, Memento Tuxedo Black
Accessories: Large Star Punch, Gold & Clear Embossing Powder, Heat Tool, Dimensionals(two full ones under each star), Aquapainter, Watercolor Wonder Crayons (in night of navy, brocade blue, more mustard, so saffron, handsome hunter & sage shadow)
ENJOY!
Thursday, November 13, 2008
Kreativ Blogger Award!!

I felt honored when my friend and fellow SU! demo Dianne S. picked me to pass on this Kreativ Blogger Award. Please go check her out (just click on here name above) and leave her some bloggy warm fuzzies. THANKS Dianne!
I enjoy blogging (and blog surfing!), but there are days when I wonder if anyone is visiting and gaining inspiration. There are so many blogs to visit, each with a unique and inspirational style. We all have our favorites that we visit regularly though. My list of favorites is too long! So here's how this works:
1. The nominee may put the logo on their blog.
2. Put a link to the person who sent you the award.
3. Nominate 5 blogs. (Heck with it - I'm changing this a bit - nominate a couple more if you like!)
4. Put links to their blogs
5. Leave a message for your nominees.
I truly enjoy papercrafting blogs that are written on the personal level as I find it really connects us to each other by giving us something we can identify with in other people. This in turn tends to motivate me in my own endeavors at all levels. These blogs fit my description so well - as do many others of my favs, but I don't like to outside ther "rules" too much, only a little - enough to "make it my own" just like how I CASE designs. ;)
1.) Paula S. - Capricious Creations
2.) Jill C. - Stamping in His Name
3.) Gina K. - A Day in the Life
4.) Taylor V. - Taylored Expressions
5.) Carla M. - Paper Pastorale
6.) Maxene C. - My PaperArts and Digital Creations
8.) Lori C. - Make a Difference
Please visit these blogs and you'll soon see what I mean! ENJOY!
Country Living Holiday Collection & Stamp Kit
Country Living and Stampin' Up! have teamed up again this year to offer you a fabulous Holiday Kit. The Kit will be featured in an eight page spread in the December issue of Country Living magazine. However, you can get a head start now on creating your keepsakes. Stampin' Up! is offering the kit to its customers now so you may get a head start. Keep reading this article. At the end you will find a wonderful promotion from Country Living.
Create beautiful handcrafted ornaments and decorations with your family and friends this holiday season with the Country Living Holiday Stamp Kit (Item #114447, $49.95)--available only while supplies last. At this busy time of year, this kit offers a convenient way to create simple and elegant ornaments to brighten your home or share as hand-crafted gifts.
The Holiday Collection Stampin' Kit (Item #114447, $49.95) includes the following products:
--Holiday Collection stamp set (six stamps)
--4) 12" x 12" sheets of die-cut chipboard
--8) 12" x 12" sheets of die-cut Designer Series paper (2 ea. of 4 double-sided designs)
--4) 12" x 12" sheets of Designer Series paper (2 ea. of 2 double-sided designs)
--2) 12" x 12" sheets of Whisper White card stock
--25 yds. Silver Metallic cord
--10 yds. 3/8" Whisper White taffeta ribbon
--Pretties Kit brads
--(20)Stampin' Dimensionals
--Dazzling Diamonds Stampin' Glitter (1/2 oz.)
--Tombow Multi Purpose Adhesive
--Riding Hood Red Classic Stampin' Spot
--Old Olive Craft Stampin' Spot
--Uninked Stampin' Spot
--Whisper White Craft Ink refill
 Click here to subscribe to Country Living for 75% off what others pay on the newsstand — 12 issues for just $12.00 — that's like getting 9 issues FREE! Plus you'll receive the exclusive Stampin' Up! Note Card Kit FREE with your paid order! ENJOY!
NEW! Stampin' Up! Country Living Holiday Kit
Create beautiful handcrafted ornaments and decorations with your family and friends this holiday season with the Country Living Holiday Stamp Kit (Item #114447, $49.95)--available only while supplies last. At this busy time of year, this kit offers a convenient way to create simple and elegant ornaments to brighten your home or share as hand-crafted gifts.
The Holiday Collection Stampin' Kit (Item #114447, $49.95) includes the following products:
--Holiday Collection stamp set (six stamps)
--4) 12" x 12" sheets of die-cut chipboard
--8) 12" x 12" sheets of die-cut Designer Series paper (2 ea. of 4 double-sided designs)
--4) 12" x 12" sheets of Designer Series paper (2 ea. of 2 double-sided designs)
--2) 12" x 12" sheets of Whisper White card stock
--25 yds. Silver Metallic cord
--10 yds. 3/8" Whisper White taffeta ribbon
--Pretties Kit brads
--(20)Stampin' Dimensionals
--Dazzling Diamonds Stampin' Glitter (1/2 oz.)
--Tombow Multi Purpose Adhesive
--Riding Hood Red Classic Stampin' Spot
--Old Olive Craft Stampin' Spot
--Uninked Stampin' Spot
--Whisper White Craft Ink refill
 Click here to subscribe to Country Living for 75% off what others pay on the newsstand — 12 issues for just $12.00 — that's like getting 9 issues FREE! Plus you'll receive the exclusive Stampin' Up! Note Card Kit FREE with your paid order! ENJOY!
Wednesday, November 12, 2008
Stampin' Philosophy - Envelopes
Warning: Stamping Philosophocal Discussion in this paragraph! :)
You can get nice quality #10 envelopes from office supply stores (business stationery section) and print shops - I mean, why get a cheapie envelope for your gorgeous card? The envelope is the first thing your recipient sees. I can't stand the thought of someone pre-judging what's inside as cheapie just becuase I skimped on the envelopes. It's like getting the cheapest wedding invitation you can to "save money", then spending gobs on the reception. The guest sees the inexpensive looking invite first, and bases his/her judgment on what kind of gift to bring on this info. How could they know the wedding and reception would be lavish by a cheapie invitation? Yes - I know this is judging a book by it's cover - and NO I am not for that. I do, however, believe that some things are a fact of our humanity whether they "should" be that way or not. Last example - when you see someone with longer, unkempt hair and clothes is your first reaction one of respect "Look at the beautiful image of God this person is!" OR if we're honest, slightly disrespectful: "Why doesn't this person care more about themselves? Geesh!"
Okay -enough of Jule's Stampin' Philosophy! lol Thanks for bearing with me. I realize a nice card is way more important than a nice envelope. To me, it's just that little extra finishing step that I try to do the majority of the time. ENJOY!
Christ Is Born Card
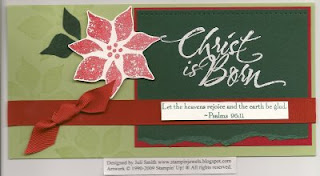
For the past couple of years, my parents have received an "early" Christmas present - their Christmas cards made by me. Mom & I both use religious designs over all. Click HERE to see last year's design for them.
This design was inspired by the Fall/Winter 2008 Idea Book & Catalog page 43 - the sample shown for the Christ is Born set. I wanted a larger size, so I expanded the proportions from fitting into an SU! small open-ended envelope to fitting into a #10 business letter sized envelope.
My mom wasn't too keen on the Kraft cardstock look of the example in the book. It asn't festive enough for her tastes. So I replaced the Kraft with Certainly Celery. Then I replaced the Handsome Hunter underlayer of Whisper White with Real Red. I added some poinsettias stamped in Versamark to the Certainly Celery on the left side for a subtle space filler. The main poinsettia image is stamped in Real Red Craft Ink, then quickly covered with Iridescent Ice Embossing Powder. Mom LOVES sparkle! This was her idea to add to the design.
I also replaced the sentiment on the outside of the card, on the 5/8" Real Red Grosgrain Ribbon. It made more sense to me to use the Scripture verse that is part of the stamp on the front of the card. The poinsettia and the Scripture verse are both raised up on dimensionals. Lastly - to save on ribbon AND increase the ease of assembly, I adhered a length of ribbon first, then adhered a separate 'knot bow' with a mini glue dot. There is paper piercing along the top edge of the Handsome Hunter layer. The leaves are the poinsettia image stamped in Handsome Hunter on the same, then individually cut out.
Stamps: Christ is Born
Cardstock: Certainly Celery, Real Red, Handsome Hunter & Whisper White
Ink: Versamark, Handsome Hunter Classic & Real Red Craft
Accessories: Real Red 5/8" Grosgrain Ribbon, White Embossiong Powder, Heat Tool, Crafters Tool Kit, Dimensionals & Mini Glue Dots.
ENJOY!
Monday, November 10, 2008
Just So Sporty Hoodie Card

I WON this fabulous stamp set called Just So Sporty, from the GinaK Designs Land Cruise Party over in the GinaK forum on SCS!! I was so excited to win something (doesn't happen very often - lol) And I've been wanting to play with the set since I received it. My first ideas were to make cards for my family (something else that doesn't happen very often! - not so funny, huh?), for my hubby and for our two oldest kids who are involved in ballet and soccer. So this first design is for my hubby, to let him know what a good job he did coaching our son's AYSO soccer team again this past season.
What motivated me to finally sit down and create this card? Remember the Paper Craft Planet post from the other day? Besides starting two of my own groups - I also joined the GinaK Designs PCP Group. I saw this challenge and decided today was the day! :) Check it out and get stamping/uploading - maybe you could be the next winner!
Stamps: Just So Sporty (GinaK Designs); God Bless (retired SU!)
Cardstock: Basic Gray, Night of Navy and Prestwick DSP(this DSP is gorgeous and perfect for masculine cards) (all SU!)
Ink: Memento Tuxedo Black (from CPS), Night of Navy and Versamark (both from SU!)
Accessories: Silver Embossing Powder, Heat Tool and Hobby Blade (all SU!)
ENJOY!
Home for Christmas - Part 2
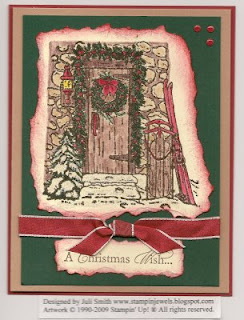 Here's another design using the wonderful Home for Christmas stamp set (in the 2008 Holiday Mini). I was going to leave the base layer as the Creamy Caramel and it would look great that way too. I was looking for a bit more POP, and the adding the Riding Hood Red as the bottom layer achieved my goal. A Blender Pen and ink pads were used to color in the image.
TIP: When you feel like the card designs you are working on needs just that little extra something - try adding a bottom layer of color. In this example, I chose the Riding Hood Red because it tied in the hints of red amongst the browns and green.
Notice the top, right corner? Those are "faux brads" - created using the 1/8" Circle Hand Punch, Two Way Glue and Crystal Effects. I punched out 3 tiny circles, glues them into the corner, then applied Crystal Effects for the 'gloss' most brads have. A perfect red accent for color balance.
Stamps: Home for Christmas
Cardstock: Riding Hood Red, Handsome Hunter, Creamy Caramel, Confetti Cream
Ink: Chocolate Chip, Close to Cocoa, Creamy Caramel, Handsome Hunter, Riding Hood Red & Summer Sun
Accessories: Riding Hood Red Taffeta Ribbon, Blender Pen, Stampin' Sponge
ENJOY!
Saturday, November 08, 2008
Home for Christmas
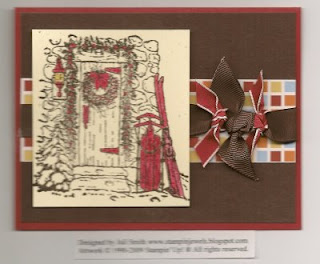
I've got a couple more designs for you all using the Home for Christmas stamp set in the current SU! Holiday Mini catalog. I used it for the Chat & Challenge #142 post using SU! Double Sided Paper (DSP). This design uses a different DSP, but only a small portion shows, just enough to add a dash of fun to the design, but not overbear the Riding Hood Red & Chocolate Chip color scheme. The watercoloring was done using the Blender Pen and Classic Ink Pads.
To plan and order your Christmas Card design supplies, contact me, o rplace your order online HERE.
Stamps: Home for Christmas
Cardstock: Riding Hood Red, Chocolate Chip, Confetti Cream & Washington Apple DSP
Ink: Chocolate Chip, Riding Hood Red & So Saffron
Accessories: Blender Pen, 5/8" Chocolate Chip Grosgrain ribbon, Riding Hood Red Taffeta Ribbon & Dimensionals
ENJOY!
Friday, November 07, 2008
Paper Craft Planet - New Groups!
Have you heard of Paper Craft Planet yet? I recently did - and now we have a FUN place to meet, chat and share our creations with all the wonderful product from Stampin' up! and CreativePlayStamps.
First - join Paper Craft Planet here.
Then join the StampinJewels PCP Group HERE.
And the CPS Group - HERE.
After that - please share your creations, comments and ideas!
Feel free to list me as a Friend!
ENJOY!
Thursday, November 06, 2008
Chat & Challenge 142
 It's been quite awhile since I hosted a Chat & Challenge over at Sudsol with my fellow demonstrators. Too long, in fact! The sketch came from Taylor VanBruggen over at Taylored Expressions. Every Friday she does a Cupcake Challenge and posts a sketch to play with over the weekend. I enjoy browsing Taylor's blog - she is a talented stamper for sure. She is also one of the original Scripture Chicks - which reminds, me, I've got TWO bookmarks to make - October and now November!
We had fun with her sketch last night at Chat & Challenge.
 So here's my design - actually done this evening. I was chatting too much - go figure! ;)
Stamps: Home for Christmas (Holiday Mini)
Cardstock: Handsome Hunter, Certainly Celery, Naturals White & Banbury DSP
Ink: Pink Pirouette, Certainly Celery, Handsome Hunter & Black StazOn
Accessories: Blender Pen, Corner Rounder and Wide Oval Punches, Pink Pirouette 5/8" Striped Grosgrain Ribbon, Silver Brads, Crafters Tool Kit, Dimensionals & Stampin' Sponge.
ENJOY!
Friday, October 31, 2008
Fall Happy Blessings - Part 2
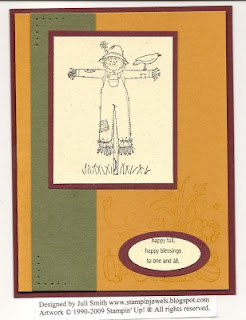
Why Part 2? Because I used the same colors and basic design HERE, but this time changed up the layout just a little bit. See how easy it is to change from vertical to horizontal? Keep your favorite layouts in mind or on hand in a sketch book (decorate an SU! On Board Journal and sketch away!) - then when you want something a little fresher - just change up the direction of the layout. Easy peasy!
Stamps: Happy Blessings
Cardstock: Bravo Burgundy, More Mustard, Always Artichoke and Naturals Ivory
Ink: Chocolate Chip, Bravo Burgundy & More Mustard
Accessories: Crafters Tool Kit, Large & Small Oval Punches
ENJOY!
Saturday, October 25, 2008
Scrapbook Pages? You Betcha!
I enjoy the GinaK Designs Kindred Spirits line of images, they all speak so much to the human experience and everyday life. The image I used is called "Summer Fun" - my kids LOVE water and when I saw this image, I *knew* it would perfect for *when I started scrapbooking*. Yah - I know -
This layout is simple - so you would think it didn't take me very long to create it. WRONG! It took somewhere between 3-4 hours from start to finish. I hope my creative process speeds up with more practice! lol Also - Art over at CreativePlayStamps helped me figure out the Macro feature of my camera (he is a good photographer, some of their nature image stamps came from his photos!) - so I gave it a try so you could see the Kindred Spirits image up close. (Lighting needs work though. You've heard the saying, "Practice makes progress" - right?)
Stamps: Summer Fun & Kindred Greetings for Kids (GinaK Designs); Quirky Alphabet Upper, Rough Edges Mini Alphabet & Simple Type Alphabet Numbers (all retired SU!)
Cardstock: Pacific Point Textured, Tempting turquoise, Green Galore, Pink Passion & Whisper White (all SU!)
Ink: Memento Tuxedo Black, SU! Whisper White Craft and Pacific Point Classic Pads
Accessories: Koh-i-Noor Pencils, Odorless Mineral Spirtis, Blending Stump; Small flower Eyelets, Stampin' Dimensionals & Stampin' Sponge
ENJOY!
Tuesday, October 21, 2008
Fall Happy Blessings

I made 32 of these cards at a Crop I attended this past Saturday, sponsored by the SCRAP Guild of Northern Illinois. I made them for support letters for the 31 couples who will attending a Worldwide Marriage Encounter Weekend in Benet Lake, WI this coming weekend. The support letter is something they will receive at the end of their Encounter Weekend letting them know other couples were praying for them and their marriage Sacrament throughout the Weekend.
I really like the color combination, very Fall and not over-bearing. The set is from the current Holiday Mini Catalog, and is called "Happy Blessings". I am enjoying the whimsical images in this set, and the coloring capabilities it offers. YES - I realize I DID NOT color in my scarecrow here! LOL Honestly, I ran out of time as the cards had to be delivered that evening. But you know what? I LIKE it not colored in!! I never thought I would say that - ever. I think the lovely colors of the card itself are enough. Something different for me, defintiely outside my "style box" - and I LIKE IT! Woohoo! The corn stalk image is stamped tone on tone in More Mustard, and though it's hard to see in the scan, it is a lovely, subtle background on the card in person. The sentiment actually begins with "happy thanksgiving..." but I didn't want that for this card. Using the Small Oval Punch was perfect, because it leaves those words off for me. A little paper piercing in the left corner of the Always Artichoke strip to tie in with the stitching on the scarecrow - and Voila, I'm done. This design was very quick & easy to make in bulk, even with the number of layers.
Stamps: Happy Blessings
Cardstock: Bravo Burgundy, More Mustard, Always Artichoke and Confetti Cream
Ink: Chocolate Chip, Bravo Burgundy & More Mustard
Accessories: Crafters Tool Kit, Large & Small Oval Punches
ENJOY!
Monday, October 20, 2008
A Day to Honor Priests/Pastors

Each year, on the third Sunday of October, Worldwide Marriage Encounter(WWME), and I believe Serra International, sponsor World Priest Day. It is a day to honor our priests and let them know how much we value and appreciate their vocation to the Sacrament of Holy Orders.
Our local WWME Community is sending out these cards to the Catholic priests in our deanery, as well as to area Christian pastors to let them know we love them and are praying for them.
This same card design is also being sent to our newly ordained priests in the Rockford Diocese on behalf of the WWME Presenting Team Community for Rockford, Madison/Milwaukee. We have also circulated and filled a prayer scroll for all our priests - and there will be married couples praying together for the 24 hours on October 26th.
Won't you join us by making a special card for YOUR priest or pastor to let them know how much you appreciate their vocation in serving God's flocks? Leave a comment on this post with a link to your card if you decide to join us.
NOTE: I was going to use the Dynamic Duo colors of Handsome Hunter & Sage Shadow - which are beautiful together. But I had a piece of Baja Breeze laying on my table, so I paired that up instead and WOW! I never would have thought those two colors would look so good together - and the Very Vanilla (rather than Whisper White makes a difference too!) Don't be afraid to try different colors together - some of them will stun you with how well they go together for the project you are working on.
For more information on Worldwide Marriage Encounter in your Christian denomination and in your part of the country/world, click on the name above. Incidentally - THIS is where I got "ENJOY" from, that I end almost all of my posts with. :)
Stamps: Everyday Blessings (Papertrey Inc.)
Cardstock: Handsome Hunter, Baja Breeze, & Very Vanilla
Ink: Handsome Hunter & Versamark
Accessories: Ticket Corner Punch, Gold Embossing Powder, Heat Tool, Pretties Kit(half-pearls)
ENJOY!
Friday, October 17, 2008
Cards for Our Troops - Christmas Edition - Part 5

Here it is - a FIFTH design for the StampinJewels Cards for Our Troops Events this month! Woohoo!! I am so thrilled to be doing this, and to know that when all the cards are completed - StampinJewels family & friends will have sent 150 Christmas Cards to some of our troops in Iraq! And it wouldn't have happened on this scale without the help of the stampers who gave the gift of their time and talent, and put their love into the stamping and assembling of these cards.
THANK YOU!!
The final event for this month is tonight, Oct. 17th at Malta Library. Find more info on the StampinJewels Calendar.
Check back to the Calendar often, to find out about future Cards for Our Troops events...St. Valentine's Day cards are next on my wish list to make and send! :)
Stamps: A Christmas Cardinal (Holiday Mini 2008)
Cardstock: Riding Hood Red, Always Artichoke, Naturals White & Brushed Gold
Ink: StazOn Black, Always Artichoke, Riding Hood Red, Chocolate Chip
Accessories: Ticket Corner Punch, Aquapainter(watercoloring with ink pads), Crafters Tool Kit (paper piercing in the front fold, right side corners), Dimensionals ENJOY!
[LOL Note: I just noticed I forgot to color in the beak and claws! I couldn't decide which color to use, then forgot about after I went to bed, heehee Better decide on that before tonight!]
Wednesday, October 15, 2008
Cards for Our Troops - Christmas Edition - Part 4

Here is the fourth design for the Cards for Our Troops events this month. This design is meant to be simple and understated because the gold heat embossed Holy Family image (from the Holy Triptych stamp set) is more than capable of speaking for itself. The sentiment comes from a NEW stamp set in the Fall/Winter 2008 Idea Book & Catalog called "Heard from the Heart".
For more info on upcoming events you can do one of two things: Bookmark my event Calendar HERE; AND/OR email me at footbag10@att.net with "Subscribe" in the Subject line and you will be added to the StampinJewels Newsletter & Updates email list. I do sometimes announce events here on the blog - however the Calendar and Newsletter & updates is your most reliable source of information on StampinJewels events.
Don't forget to subscribe to this Blog as an inspiration resource! :)
Stamps: Holy Triptych & Heard from the Heart
Cardstock: Handsome Hunter and Very Vanilla
Ink: Handsome Hunter & Veramark
Accessories: Gold Embossing Powder, Embossing Buddy, Heat Tool
ENJOY!
Tuesday, October 14, 2008
Cards for Our Troops - Christmas Edition - Part 3
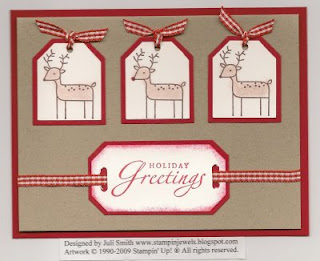
This is a third design for the Cards for Our Troops events this month. At the first event, Theresa and Susan got a lot done on this design, so the final event this month will find this design being assembled. THANKS AGAIN Theresa and Susan for all your wonderful help! :)
I have pined over the loss of Confetti Tan card stock for a couple of years now (actually, I don't even remember when SU! retired that neutral! lol), and resisted liking the Kraft card stock. I've used it several times over the last few months, and now I like it A LOT! lol I blame this on demo friend Tina M. who uses Kraft all the time. It took a couple years of her influence (- but I still won't become a "fly baby"! lol) The reindeer image is stamped in Chocolate Chip, then colored in with Close to Cocoa Stampin' Pastels - direct to paper for a soft look. The sentiment is sponged around the edges with Real Red to soften the starkness of the white around the words.
This is a classic layout that is quick and easy to put together when you need a card fast. Whether you use tag, circle, oval or square punches doesn't matter, and it doesn't have to be layered either. Three images across the top and a sentiment underneath - maybe add a background if you like.
Stamps: Merry & Bright, Sincere Salutations
Cardstock: Kraft, Real Red & Whisper White
Ink: Chocolate Chip & Real Red
Accessories: Real Red Gingham Ribbon, Stampin' Pastels, Tag & Small Tag Punch, Tag Corner Punch, 1/8" Hand Punch, Horizontal Slot Punch & Stampin' Sponge
ENJOY!
Monday, October 13, 2008
Cards for Our Troops - Christmas Edition - Part 2
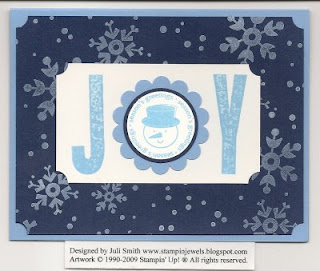
Here is a second design for the Cards for Our Troops events this month. This design was completed last Friday - a quantity of 25.
The second event is coming on 10/17 - see my SU! site Calendar for more info, or contact me.
I found several packs of retired colors in my closet [what's in your closet? ;) ], one of them was Bliss Blue. Anyone remember that color? I still like it! It would be nice to keep every color, wouldn't it?
Stamps: Deer Friends (Level 2, Host Set), Bold Snowflakes Jumbo Wheel, Headline Alphabet(retired)
Cardstock: Bliss Blue (retired), Night of Navy & Whisper White
Ink: Whisper White Craft Ink, Bliss Blue (retired)
Accessories: Scallop, 1 3/8" & 1 1/4" Circle Punches & Ticket Corner Punch
ENJOY!
Saturday, October 11, 2008
COPIC Sketch Markers on Sale?!
Hey Copic Marker fans - did you know that CreativePlayStamps carries these wonderful markers AND that they are on SALE at 25% Off right now? For the Copic Sketch Marker sale click HERE.
While you're there - sign up for their newsletter for product updates and coupons, then browse their EXTENSIVE selection of paper-crafting supplies. They've really expanded this past year with awesome products.
Tell them StampinJewels sent you! :)
ENJOY!
While you're there - sign up for their newsletter for product updates and coupons, then browse their EXTENSIVE selection of paper-crafting supplies. They've really expanded this past year with awesome products.
Tell them StampinJewels sent you! :)
ENJOY!
YOU Did It! - Cards for Our Troops


The first StampinJewels Cards for Our Troops event was a success! THANK YOU to Anita, Cathy, Jen, Patti, Susan & Theresa for joining me in stamping and assembling cards!! A BIG THANKS to Jay at JDZ's Pizza downtown Malta, IL for the use of his room at the restaurant. We had fun chatting, stamping & enjoying pizza and snacks.
The above two cards are what Cathy worked on - both her own designs! She said she was inspired by other sites and galleries - aahh, a stamper after my own heart - another who knows the joy of CASE'ing (Copy And Share Everything)!!
The first design uses the Doodle This stamp set to create poinsettia-like flowers, as well as a Cuttlebug A2 Embossing Folder - D'vine Swirls. The second design features the NEW Snow Swirled stamp set. GREAT JOB, Cathy and THANKS for your donation for the Cards for Our Troops event!
Between Cathy's cards and the cards the other fabulous gals helped with - we've got 81 cards completed, and many more in progress - WAHOOO! The initial StampinJewels goal was 100 cards - now it's 200 cards. I'm going to add another design for the Oct. 17th event (please see my Calendar here for details.)
I'll post more Cards for Our troops designs over the next few days - I've got at least three more to share with you, so stay tuned! ENJOY!
Friday, October 10, 2008
Cards for Our Troops - Christmas Edition
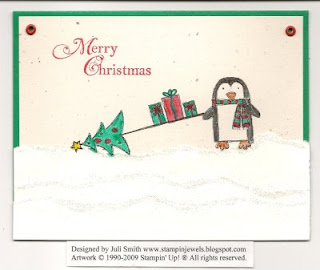
I am so excited to share with you my first ever "Cards for Our Troops" events. I've been wanting to do something like this for a long time - in honor of World Card-Making Day this month (Oct. 4th) I planned two events. The first one is tonight - Oct. 11th. The second one is Friday, Oct. 17th. The details are listed on my SU! site and on Stampin' Up!'s World Card-Making Day Events page.
For these first events, I am working with Martie Shea, a fellow demo & Sudsoler who has been living this ministry for quite some time. You can check her out at http://stampinfromtheheart.typepad.com
The StampinJewels goal for these first two events is at least 100 Christmas cards - which will go to Iraq for some of our troops personal use , i.e. so *they* can send some Christmas love home to family and friends. I'll post the other three designs over the next few days. This merry little penguin is all ready to bring his love - he's got the tree and the presents! The images are colored by dipping the Blender Pen into the marker colors that have been scribbled on a stamp case lid. It's Watercoloring with the Stampin' Write Markers, and gives a slightly softer look than direct marker coloring, as well as allowing you to create some shadowing if desired. To create the look of layered "snow", tear the Whisper White between your fingers, adhere in layers, then go over the torn parts with your Two Way Glue Pen and apply Dazzling Dimaonds glitter.
Stamps: Punch Pals & Holidays & Wishes
Cardstock: Glorious Green, Confetti White & Whisper White
Ink: Basic Gray, Real Red
Accessories: Blender Pen, Stampin' Write Markers, Real Red Eyelets, Dazzling Diamonds Glitter, Two Way Glue Pen.
ENJOY!
Thursday, October 09, 2008
Scallop Peppermint Spiders
I found this idea on Lisa Freeman's site - thanks for the great idea Lisa! I still have some of the Peppermint Patties left in a bag on my stamp table from the Batty for You Bouquet I did a few weeks ago. So when I saw these, I *had* to make some to share with you all. No stamps necessary - just a few of the awesome Stampin' Up! punches! Give it a try and let me know how it turns out and what you use it for.
Cardstock: Basic Black, YoYo Yellow, Lovely Lilac, Green Galore, Only Orange, Pink Passion,
Whisper White
Accessories: Scallop Circle, Photo Corners & 1/2" & 1/4" Circle Punches.
ENJOY!
Wednesday, October 08, 2008
Chat & Challenge 137
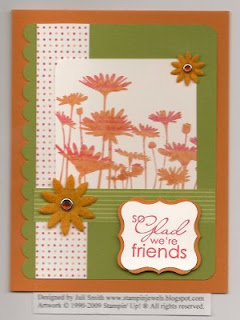

It's been quite awhile since I hosted a C&C, but even longer since I posted it here! I got this FABULOUS sketch from Valerie Salmon's site http://gotsketch.blogspot.com/. It is a scrapbook page sketch (#65), but I immediately saw a card in it - and 20 minutes later had the inspiration you see next to the sketch! This was a record time for me - which points to a great sketch in my mind! A square card would perfect for this sketch, but I wanted to show how to adapt to a slightly different shape - so I did a standard 4 1/4" x 5 1/2" design.
Stamps: Upsy Daisy, Best Yet(Level 1 Host)
Cardstock: Pumpkin Pie, Old Olive, Whisper White, Summer Picnic DSP
Ink: Pumpkin Pie & Real Red
Accessories: Scallop Edge, Curly Label & Corner Rounder Punches, Fire Circle Brads(red), Flower Fusion Accents & Elements & Dimensionals
ENJOY!
Chat & Challenge 137

It's been quite awhile since I hosted a C&C, but even longer since I posted it here! I got this FABULOUS sketch from Valerie Salmon's site http://gotsketch.blogspot.com/. It is a scrapbook page sketch (#65), but I immediately saw a card in it - and 20 minutes later had the inspiration you see here!

This was a record time for me - which points to a great sketch in my mind! A square card would be perfect for this sketch, but I wanted to show how to adapt to a slightly different shape - so I did a standard 4 1/4" x 5 1/2" design.
Stamps: Upsy Daisy, Best Yet(Level 1 Host)
Cardstock: Pumpkin Pie, Old Olive, Whisper White, Summer Picnic DSP
Ink: Pumpkin Pie & Real Red
Accessories: Scallop Edge, Curly Label & Corner Rounder Punches, Fire Circle Brads(red), Flower Fusion Accents & Elements & Dimensionals
ENJOY!
Monday, October 06, 2008
Frankie's Funky Friends
Remember my post of Frankenstein and His Chocolate Bride? Here's another twist with a bunch of funky friends thrown in for 'ghoul'd measure! :) I am using this picture with permission from my Sudsol friend, Gretchen Barron. (Find her original post on these adorable card ideas by clicking on her name.)
The main part of the faces/heads are made using the Big Shot and the EXCLUSIVE SU! die called the Top Note. Mine won't be here in time for me to CASE these adorable cards so Gretchen very kindly gave me permission to use her image. Check out Gretchen's blog - she has incredible talent, and I know you'll be inspired by her talent just like I am. THANKS Gretchen!
If you missed the announcement - SU! now offers the Big Shot, as well as exclusive SU! dies to go with it. Check out my SU! website for more info. Ordering the Big Shot can be an instant Host Benefits order depending on which package you decide on! So check it out and let me know what you'd like! It would also make a wonderful Christmas Wish List item. If you'd like to get started on your Chirstmas Wish List, email me at footbag10@att.net and I'll reply with it attached.
NOTE: Want to find all the Halloween related projects on my blog? Just click on the label "Halloween" and they'll all come up! ENJOY!
Thursday, October 02, 2008
WIN Photoshop Elements 7!

Well- that's not the best image of Photoshop 7 - but we want to WIN it not look at it, right?! ;)
I'm sharing this with you here, since taking photos of our fabulous paper-crafting projects, as well as taking good photos for our scrapbooks.
Head on over to The Secret is in the Sauce
to find out more! And don't forget to leave comments here and on the blogs you visit - it's always nice to know what you enjoy about the blog and the posts shared there.
ENJOY!
Tuesday, September 30, 2008
Upsy Daisy Favor

This is a favor I made for our Women at the Well (WATW) program at my parish. This program occurs about four times during the school year, and this is our sixth season. We provide a light dinner of soup, bread and dessert (getting donations for these if possible), and then have a presentation by an inspirational speaker. It is an evening of spiritual renewal, so when I found this little "kit", I knew it would be perfect for a WATW evening. I made the "poem" so that it fit the cello bag topper. What you see in the picture is a closed topper with the cello bag and it's contents, plus an open topper (bag is tucked underneath). The fold over Confetti Cream hides the staples that keep the topper closed over the cello bag. I do not know where the words originated from, but as usual I didn't do a straight CASE either. ;). Here's what it says...
To: My Beautiful Woman
From: The Lover of Your Soul
A Loving Gift of Everyday Reminders:
♥ Toothpick – Pick out the good qualities in yourself and others. Matt 7:1
♥ Rubber Band – Be flexible. Things may not always go the way you want,
but it will work out. Romans 8:28
♥ Band-Aid – Heal hurt feelings, yours or someone else’s. Col. 3:12-14
♥ Pencil – List your blessings everyday. Eph 1:3
♥ Eraser – Everyone makes mistakes, and it’s okay. Gen 50:15-21
♥ Chewing Gum – Stick with it. There is nothing WE cannot accomplish TOGETHER. Phil 4:13
♥ Mint – You are worth a mint to Me. John 3:16-17
♥ Candy Kiss – Everyone, including you, needs a kiss or hug everyday. 1 John 4:7
♥ Tea Bag – Meet me daily for intimate conversation in the Living Room. It is our R&R (reconciliation and rejuvenation). I’m there every day, longing for your company. John 4:4-30
My Love – Together, We can Live Every Day Fully and Joyfully!
Stamps: Upsy Daisy
Cardstock: Not Quite Navy, Confetti Cream
Ink: Tangerine Tango, Riding Hood Red and Not Quite Navy
Accessories: Small Cello Bags, Slot Punch, Scallop Edge Punch, staples
ENJOY!
Cardstock: Not Quite Navy, Confetti Cream
Ink: Tangerine Tango, Riding Hood Red and Not Quite Navy
Accessories: Small Cello Bags, Slot Punch, Scallop Edge Punch, staples
ENJOY!
Friday, September 26, 2008
Mom's Daisy
 Here is the card I will be sending my Mom to thank her for accepting the vocation to care for her mom, my Grandma. Click HERE for my original post about my Grandma, Alzheimers and the Heart to Heart Blog Candy.
A BIG Thanks to Carolyn King, not only for the awesome blog candy opportunity, but more importantly for the gentle reminder that we should never assume the people who inspire us in anyway already know they are an inspiration. Just like saying "I Love You" to spouse and kids, or giving hugs - we need to find a way to demonstrate our gratitude every day. What better way than by using our love for papercrafting as our starting point? THANKS again to the myriad individuals and companies who sponsored the Heart to Heart Blog Candy.
REMEMBER - YOU DON'T HAVE TO MEET THE BLOG CANDY DEADLINE TO SEND YOUR CARD! Please just do it as soon as you can - and maybe think about doing some Fall or Thanksgiving cards this year for other service providers you admire. THANKS!
Stamps: Upsy Daisy
Cardstock: Not Quite Navy, Kiwi Kiss, Whisper White
Ink: Tangerine Tango, Riding Hood Red & Versamark
Accessories: Tangerine Tango 5/8" Striped Grosgrain Ribbon, Pretties Kit, White Embossing Powder, Heat Tool, Dimensionals, Mini Glue Dots; Non-SU! Marvy Giga Scallop Oval Punch
ENJOY!
Thursday, September 25, 2008
A Batty Bouquet (Tutorial Included)
Here's a brief tutorial...
Grass: Use a strip of Kiwi Kiss CS and run it through the SU! Crimper, then cut it into narrow strips. Fold the crimped strips in half at a slight angle and stick them loosely in with the styrofoam base to create the "grass".
Flowers: Stamp your chosen images from the Batty for You Stamp Set - then punch them out using the 1 1/4" Circle Punch. Use the 1 3/8" Circle Punch to punch out your choice of coordinating background layer. Punch TWO Scallop Circles for each flower. Adhere all layers of the front of the "flower". Use Mini Glue Dots (or Sticky Strip) to adhere the completed "flower" front to a Peppermint Patty. Use another Mini Glue Dot to adhere the non-layered "flower" back to the Peppermint Patty. Insert lollipop stick (these may be found wherever Wilton supplies are sold.) Tie a bit of Black Gingham Ribbon around the stick, under the "flower". Poke stick into styrofoam base to create the bouquet. Repeat this step for as many "flowers" as you want to make.
"Vase": Measure your chosen "vase" and cut a strip of Tangerine Tango CS to wrap around it, securing with Mini Glue Dots (or Sticky Strip). Measure and cut TWO pieces of Black Gingham Ribbon, and ONE piece of Tangerine Tango 5/8" Striped Grosgrain. Adhere to cardstock strip with Mini Glue Dots.
"Vase" Label: You may want to use the Stamp-a-ma-ji here if you are not good at eyeballing lining up images. Ink up the "Happy" from the"Happy Halloween" stamp in the All Holidays set and stamp on Whisper White CS. Clean stamp. Ink up the "Halloween" from the same stamp, and position under the "Happy" you just stamped. Then punch out with the Curly Label Punch, using the direct-to-paper technique to add Kiwi Kiss ink to the edges of the punched out cardstock. Punch out TWO more Curly Labels in a contrasting cardstock color - I used Basic Black. Turn one vertically, and adhere to the back of your punched sentiment. Holding the other one horizontally, use your Paper Snips to cut it in half. Layer and adhere one piece to each end of your punched sentiment. This create the 'faux layering' you see on my sample. Here's a close up of the "flower" for you..
Stamps: Batty for You & All Holidays (SU!)
Cardstock: Basic Black, Kiwi Kiss, Tangerine Tango, Lovely Lilac, Whisper White, Summer Sun
Ink: Whisper White Craft Ink, Black StazOn, Kiwi Kiss, Tangerine Tango, Lovely Lilac
Accessories: Scallop Circle, 1 3/8" Circle, 1 1/4" Circle Punches and Curly Label Punches; Tangerine Tango 5/8" Striped Grosgrain Ribbon: Black Gingham Ribbon; Crimper; Mini Glue Dots; Dimensionals; Non-SU! - glass square,votive holder, styrofoam cone, lollipop sitcks, Peppermint Patties.
ENJOY!
Wednesday, September 24, 2008
Alzheimers & Heart to Heart Blog Candy - WOW!
Walk, NO RUN - over to Carolyn King's blog and check out the more than super awesome Heart to Heart Blog Candy. Really, I mean it - there's over $800 worth of handmade items and papercrafting supplies and resources available to win - FOR ONE PERSON. Go check it out and see how to enter this AMAZING Blog Candy giveaway by doing what we all love to do - papercrafting - a card for an Alzheimers Caregiver. You have until 9/26 to enter.
I think most, if not all, of us have been touched by Alzheimers Disease in some way - whether directly through a family member or other loved one, or through a friend whose family member or loved one is experiencing this sad disease.
For me, my maternal Grandma is struggling with this disease, and my Mom is her legal caretaker. My parents uprooted themselves, and moved a few hours away from their local children and grandchildren (some of my family already lives many states away) to take on this loving and sacrificial yet daunting and heart-breaking task. My Mom shared that she and my Grandma had talked, years ago, about who would care for my Grandma should the need arrive. I am pretty sure neither of them expected Alzheimers to play a major role in Grandma's caretaking needs. Luckily, my Grandma remains is generally good spirits, and readily accepts that people she doesn't recognize are her children, grandchildren and great-grandchildren.
Here's a scrapbook page I did a few years ago. That's me and our three (long before our two in Heaven came along). Grandma was already living with my parents, but the Alzheimers was in it's earliest stages and she still knew who we were. She doesn't now.

I think most, if not all, of us have been touched by Alzheimers Disease in some way - whether directly through a family member or other loved one, or through a friend whose family member or loved one is experiencing this sad disease.
For me, my maternal Grandma is struggling with this disease, and my Mom is her legal caretaker. My parents uprooted themselves, and moved a few hours away from their local children and grandchildren (some of my family already lives many states away) to take on this loving and sacrificial yet daunting and heart-breaking task. My Mom shared that she and my Grandma had talked, years ago, about who would care for my Grandma should the need arrive. I am pretty sure neither of them expected Alzheimers to play a major role in Grandma's caretaking needs. Luckily, my Grandma remains is generally good spirits, and readily accepts that people she doesn't recognize are her children, grandchildren and great-grandchildren.
I'd like to share some of the things I know about
the amazing woman my Grandma is...
♥ Grandma is in her early 90's
♥ She is a breast cancer survivor for I think about 20 years now
♥ She has 15 children - 13 born, 1 miscarriage, 1 stillbirth
♥ She outlived her youngest child, my Uncle Curtis
♥ She lived the hard life of a farm wife
♥ She lived with a husband who dealt with mental illness & alcoholism
♥ She was a nurse for many years
♥ She loves to dance, even still today!
♥ She met her second husband at a dance hall (I think she was in her 50's then)
♥ She has 48 grandchildren - 24 boys and 24 girls
♥ She has over 70 great-grandchildren and several great, great grandchildren
♥ Her name is Klementine
♥ My Darling Klementine is one of her favorite songs
♥ She loves roses, especially red ones
♥ Her favorite color is red
♥ She loves having her own box of chocolates
♥ She is of Polish descent and sometimes still prays in Polish
♥ She loves her Catholic faith
Here's a scrapbook page I did a few years ago. That's me and our three (long before our two in Heaven came along). Grandma was already living with my parents, but the Alzheimers was in it's earliest stages and she still knew who we were. She doesn't now.

WE LOVE YOU GRANDMA/GREAT-GRANDMA!
Subscribe to:
Posts (Atom)


